
আপনাদের সকলকে শুভেচ্ছা জানিয়ে শুরু করছি আমার আজকের টিউন। আজকে আমি আপনাদের সাথে যে সফটওয়্যারটি শেয়ার করব তার নাম হল Drive SnapShot. এই সফটওয়্যারটির সাহায্যে আপনি C drive-এর হুবহু ইমেজ নিতে পারবেন অথাৎ আপনার C drive-এর বেকআপ নিতে পারবেন। এর মাধ্যমে operating system চালু অবস্থায় বেকআপ নেয়া যায়।
এক নজরে এর ফিচারগুলো দেখে নিই-
Features:
• Create Disk Image Backups, while running Windows
• There is no restart (to DOS) necessary. Never.
• Continue your work, while the Backup is in progress
• The new Snapshot technology ensures, that all data are consistent, and reflect the PC's data at the start of backup. There are no difficulties with opened files. Never.
• This enables a very fast and easy way to backup servers and other computers, that must run 24 hours a day.
• Easy Use and Restore of single Files or directories
• Drive Snapshot creates a virtual drive, containing all your drives data. You may use, compare, or restore these files directly from the Disk Image file.
• This works with any program of your choice, including (of course) the Windows Explorer
• Complete Restore of a disk in case of Disaster
• If a disk is restored to it's original state, it will be exactly the same as at the time of Backup - byte for byte.
• Restoring a system partition will require DOS; other drives can be restored using
Windows:
• Compatible to all Windows file systems (FAT16, FAT32, NTFS)
• Compatible to all Windows RAID Methods
• Very easy and comprehensive command line interface
• This makes automation of regular tasks a breeze.
Homepage - http://www.drivesnapshot.de/
আসুন এবার দেখে নিই এর কাযপদ্ধতিগুরলো-
ডাউনলোড: সফটওয়্যারটি ডাউনলোড করে ইন্সটল করে নিই এবং সাথে দেওয়া কীজেন দিয়ে রেজিস্টার করে নিই।

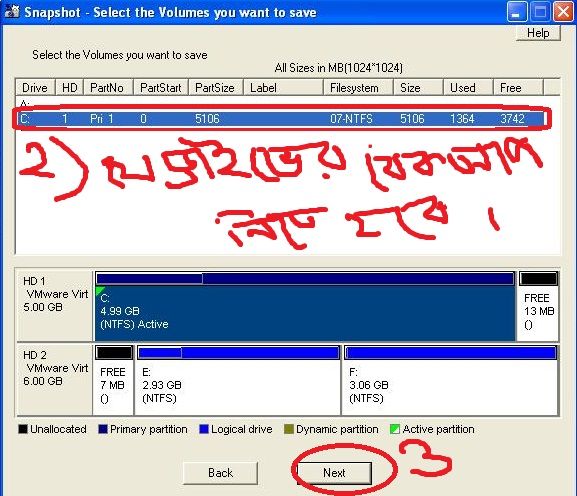
২)এবার (২)নং ছবির মত যে ড্রাইভ-এর বেকআপ নিবেন তা সিলেক্ট করে (৩)নং ছবির মত Next-এ ক্লিক করি।
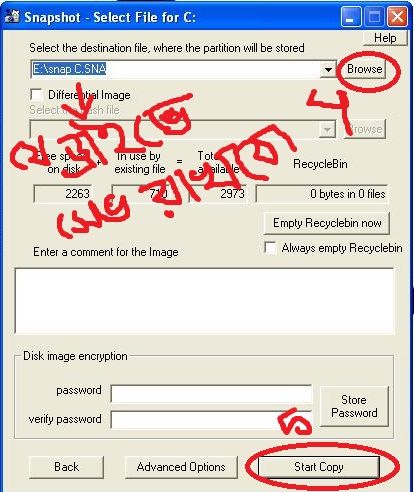
৩) এবার বেকআপটিকে যেখানে সেভ করবেন তা (৪)নং ছবির মত ব্রাউজ করে দেখিয়ে দিয়ে (৫)নং-এর মত start copy-তে ক্লিক করি। তাহলে আপনার বেকআপ প্রসেসিং শুরু হবে।
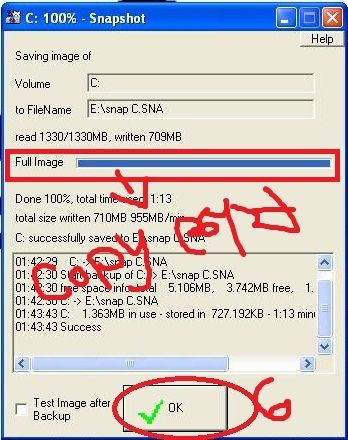
৪) বেকআপ প্রসেসিং শেষ হলে (৬)নং এর মত ok বাটনে ক্লিক করলেই কাজ সম্পন্ন হয়ে যাবে।
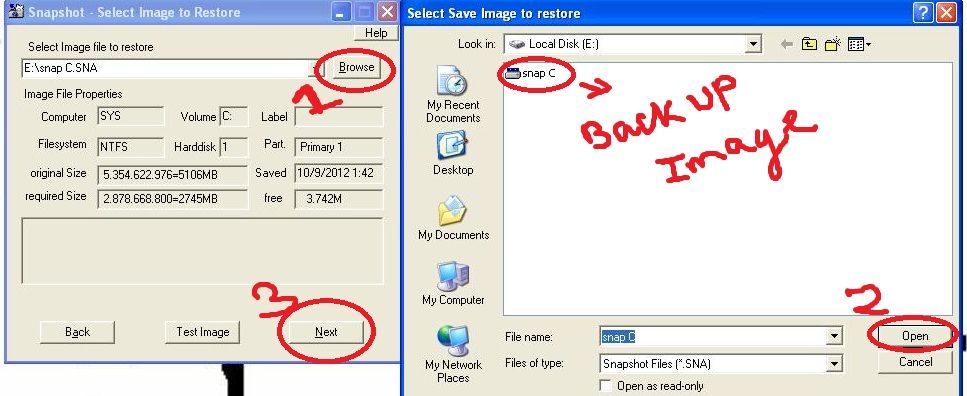
২)এবার ছবির মত (১)নং-এ browse করে বেকআপ ফাইলটি দেখিয়ে দিয়ে (৩)নং-এর মত Next-এ ক্লিক করি।
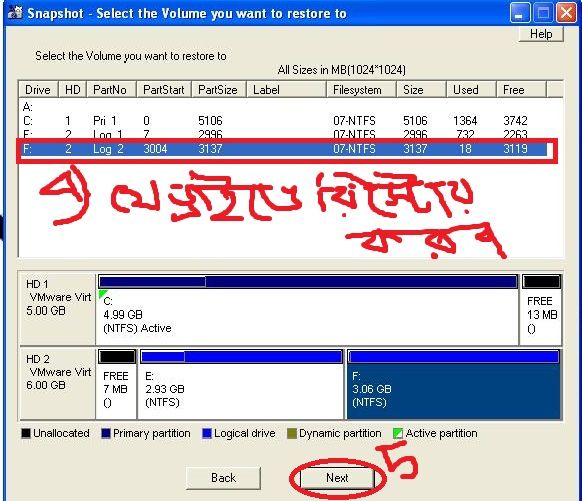
৩) এবার বেকআপ ফাইলটি যে ড্রাইভ-এ রিস্টোর করব তা ছবির (৪)নং-এর মত ড্রাইভটি সিলেক্ট করে (৫)নং-এর মত Next –এ ক্লিক করি।
৪) এরপর ২ বার yes বাটনে ক্লিক করি, ফলে কম্পিউার রিস্টাট হয়ে রিস্টোর হওয়া শুরু হয়ে যাবে। রিস্টোর হয়ে গেল কী-বোডের যেকোন কী প্রেস করলে কম্পিউটার পুনরায় রিস্টাট হয়ে চালু হয়ে যাবে।
এক নজরে এর ফিচারগুলো দেখে নিই-
Features:
• Create Disk Image Backups, while running Windows
• There is no restart (to DOS) necessary. Never.
• Continue your work, while the Backup is in progress
• The new Snapshot technology ensures, that all data are consistent, and reflect the PC's data at the start of backup. There are no difficulties with opened files. Never.
• This enables a very fast and easy way to backup servers and other computers, that must run 24 hours a day.
• Easy Use and Restore of single Files or directories
• Drive Snapshot creates a virtual drive, containing all your drives data. You may use, compare, or restore these files directly from the Disk Image file.
• This works with any program of your choice, including (of course) the Windows Explorer
• Complete Restore of a disk in case of Disaster
• If a disk is restored to it's original state, it will be exactly the same as at the time of Backup - byte for byte.
• Restoring a system partition will require DOS; other drives can be restored using
Windows:
• Compatible to all Windows file systems (FAT16, FAT32, NTFS)
• Compatible to all Windows RAID Methods
• Very easy and comprehensive command line interface
• This makes automation of regular tasks a breeze.
Homepage - http://www.drivesnapshot.de/
আসুন এবার দেখে নিই এর কাযপদ্ধতিগুরলো-
ডাউনলোড: সফটওয়্যারটি ডাউনলোড করে ইন্সটল করে নিই এবং সাথে দেওয়া কীজেন দিয়ে রেজিস্টার করে নিই।
বেকআপ নেয়ার পদ্ধতি:-
১) সফটওয়্যারটি ওপেন করে নিচের (১)নং ছবির মত “Backup Disk To File”-এ ক্লিক করি।২)এবার (২)নং ছবির মত যে ড্রাইভ-এর বেকআপ নিবেন তা সিলেক্ট করে (৩)নং ছবির মত Next-এ ক্লিক করি।
৩) এবার বেকআপটিকে যেখানে সেভ করবেন তা (৪)নং ছবির মত ব্রাউজ করে দেখিয়ে দিয়ে (৫)নং-এর মত start copy-তে ক্লিক করি। তাহলে আপনার বেকআপ প্রসেসিং শুরু হবে।
৪) বেকআপ প্রসেসিং শেষ হলে (৬)নং এর মত ok বাটনে ক্লিক করলেই কাজ সম্পন্ন হয়ে যাবে।
রিস্টোর করার পদ্ধতি:-
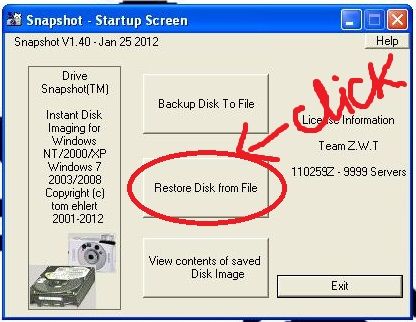
১) সফটওয়্যারটি ওপেন করে নিচের ছবির মত “Restore Disk from File”-এ ক্লিক করি।২)এবার ছবির মত (১)নং-এ browse করে বেকআপ ফাইলটি দেখিয়ে দিয়ে (৩)নং-এর মত Next-এ ক্লিক করি।
৩) এবার বেকআপ ফাইলটি যে ড্রাইভ-এ রিস্টোর করব তা ছবির (৪)নং-এর মত ড্রাইভটি সিলেক্ট করে (৫)নং-এর মত Next –এ ক্লিক করি।
৪) এরপর ২ বার yes বাটনে ক্লিক করি, ফলে কম্পিউার রিস্টাট হয়ে রিস্টোর হওয়া শুরু হয়ে যাবে। রিস্টোর হয়ে গেল কী-বোডের যেকোন কী প্রেস করলে কম্পিউটার পুনরায় রিস্টাট হয়ে চালু হয়ে যাবে।
কোন মন্তব্য নেই:
একটি মন্তব্য পোস্ট করুন